大模型,小探索 —— 还在等 Sora 公测? 先部署个 diffusion
微信公众号内容地址: https://mp.weixin.qq.com/s/HEVb_dqj5ziyyEe2RGPI9w
Sora 背后的两大技术革新:Patch 补丁 + DiT 扩散型变换器(Diffusion Transformer)
上一篇小狗屁刚搞定了“万事开头难” —— 超算互联网平台的试用和百川大模型的部署,OpenAI 就又发布了新的王炸 —— Sora,视频生成模型。
在看了一轮铺天盖地的相关文章之后,小狗屁总结,适合小步迭代的第一步,便是继续在超算互联网平台上部署 stable diffusion,图片生成模型。一方面,仍然是按照“先部署,再训练;先实验,再理论”的小探索模式;另一方面,也验证下举一反三的能力,测试部署效率。
部署概览
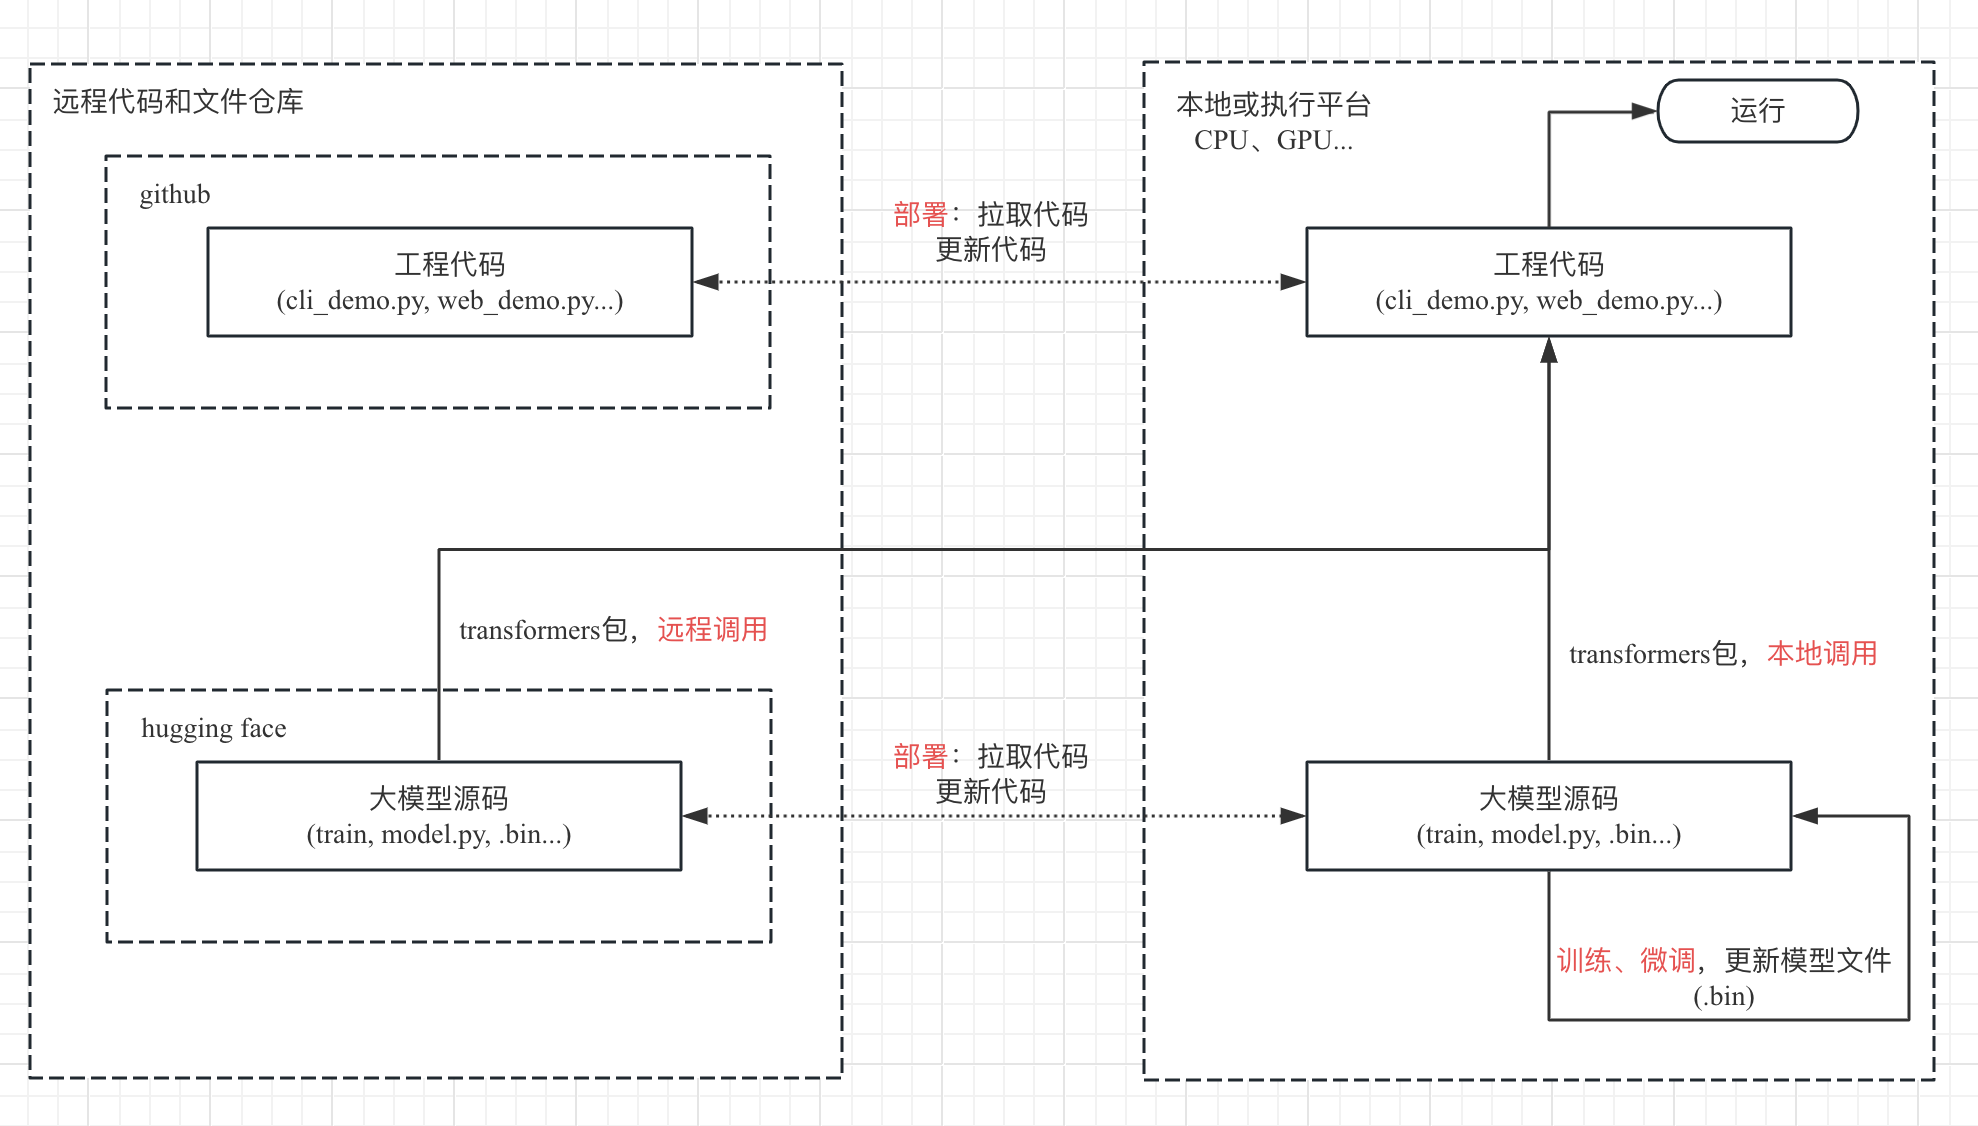
目标远程代码和模型文件仓库
GitHub
GitHub 地址:https://github.com/CompVis/stable-diffusion
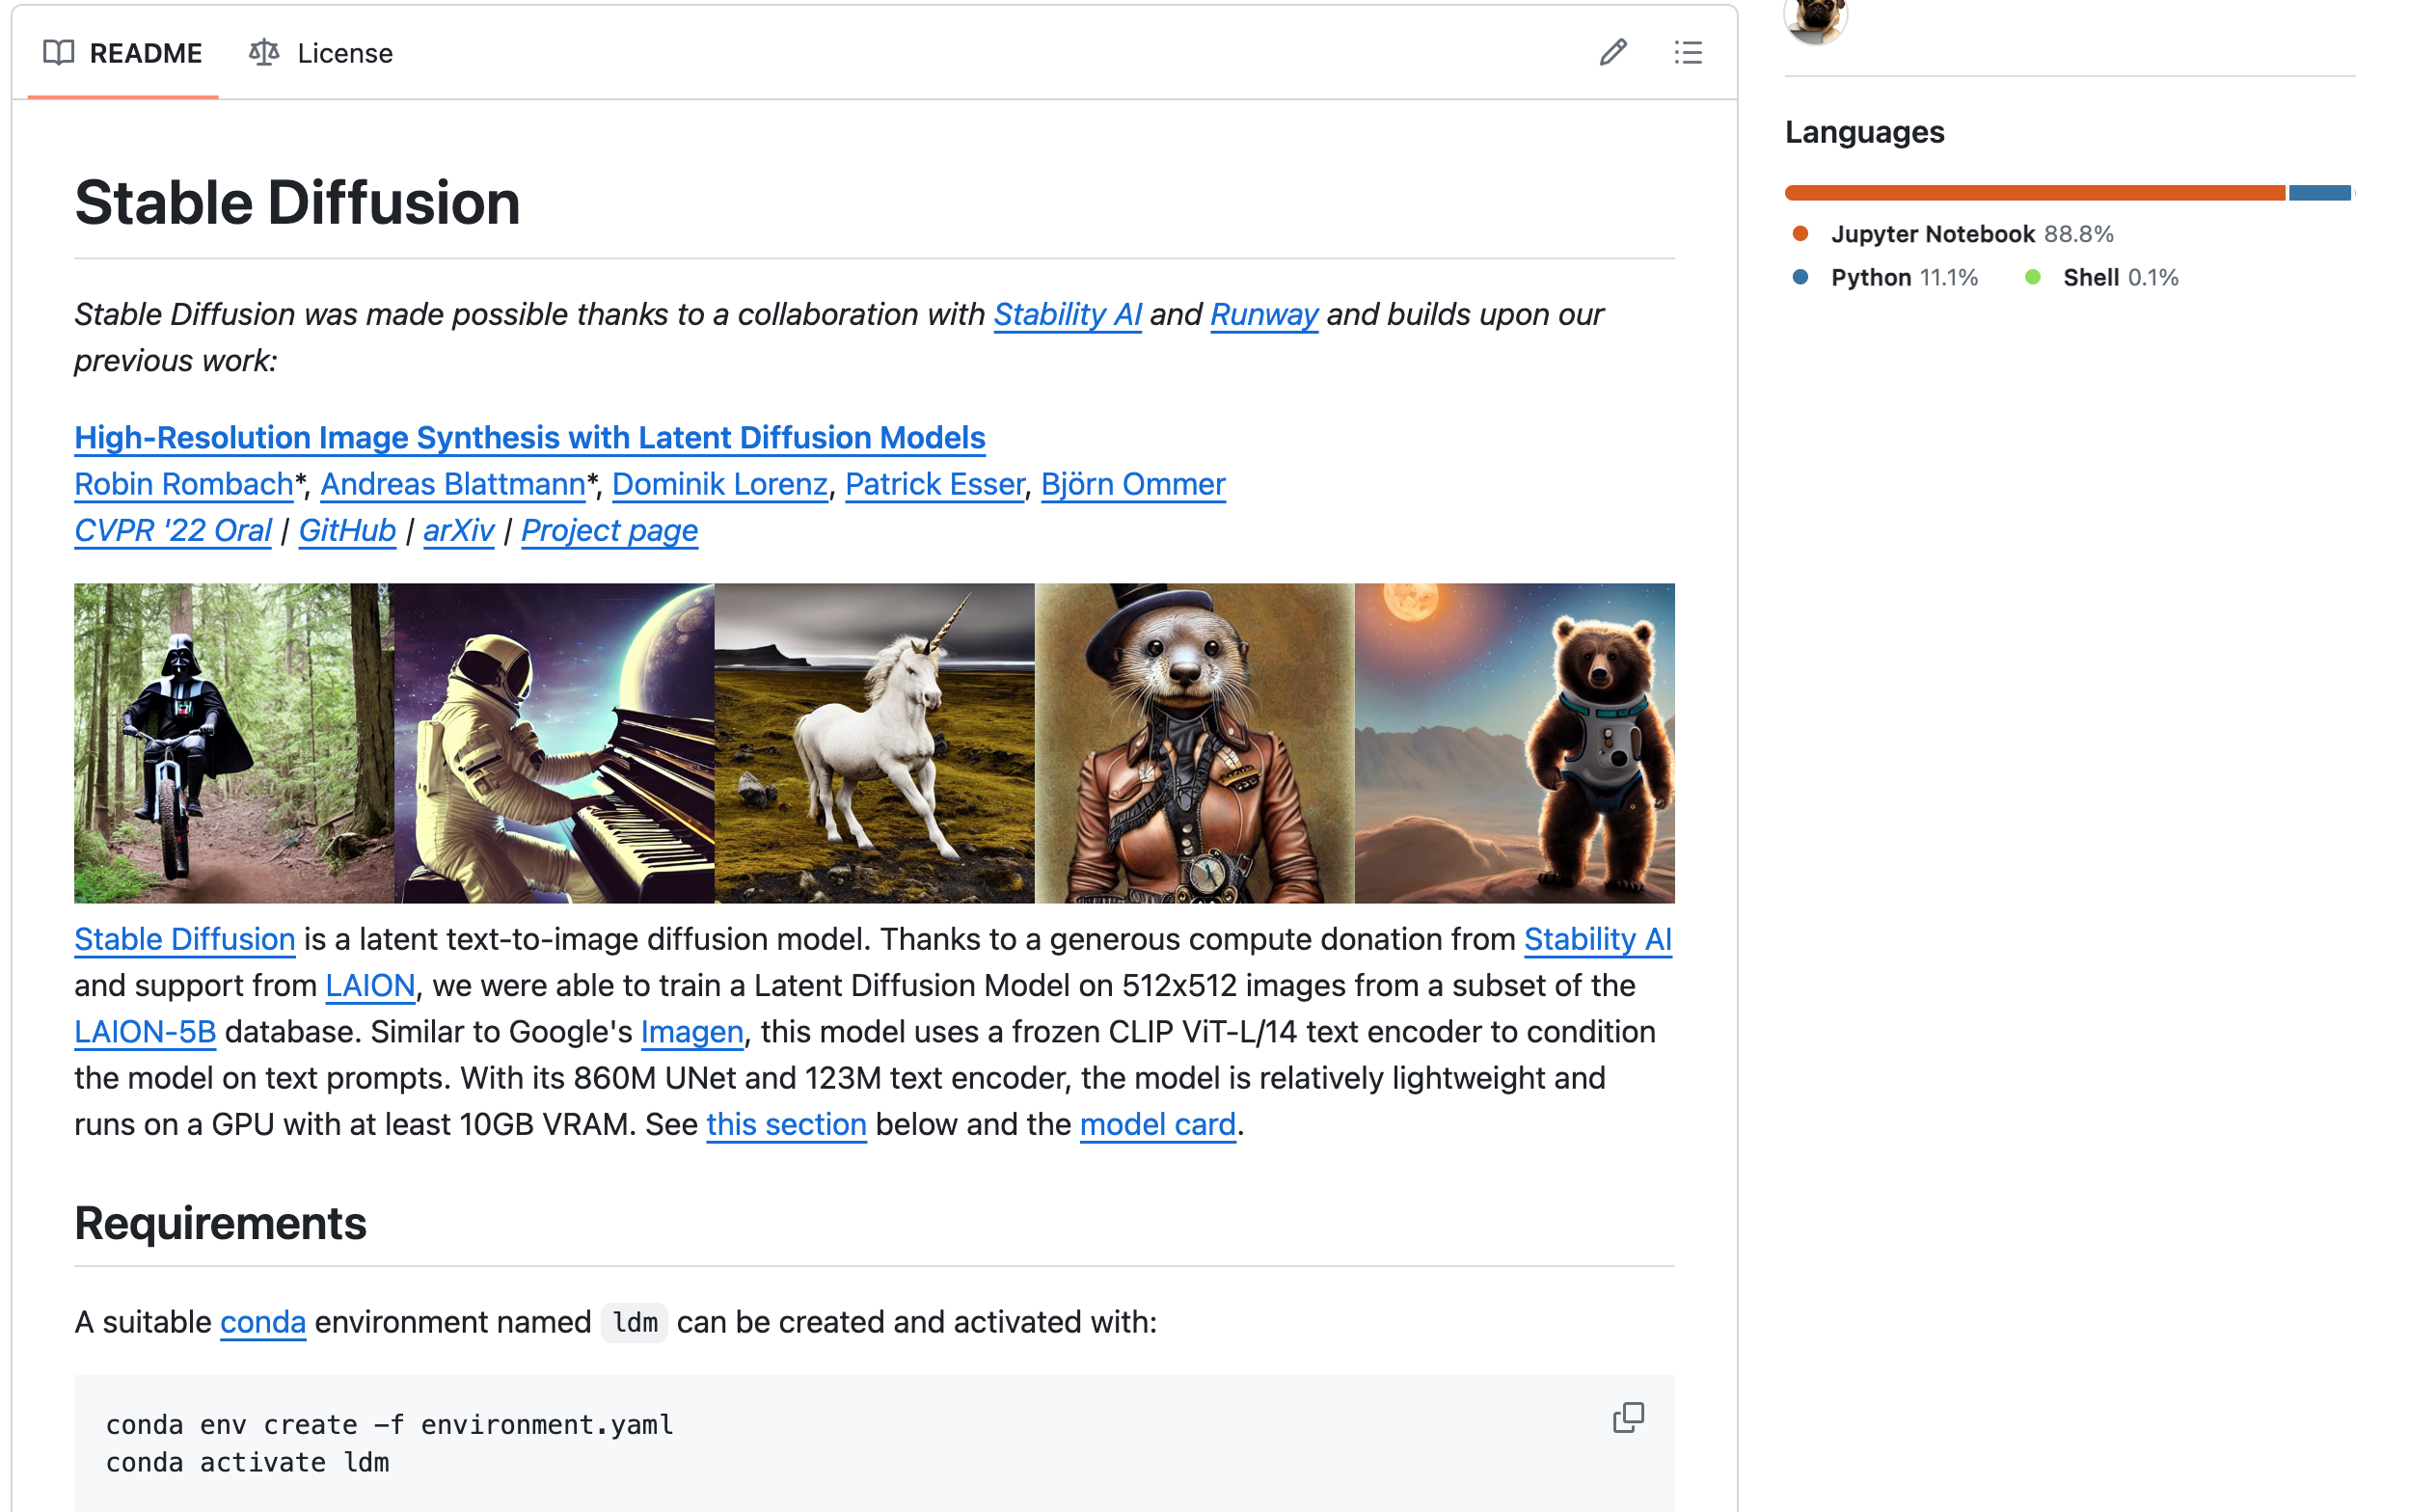
在工程代码的 README 中,提供了 python 环境的安装、模型文件的配置、以及调用示例。
Hugging Face
Hugging Face 地址:https://huggingface.co/CompVis
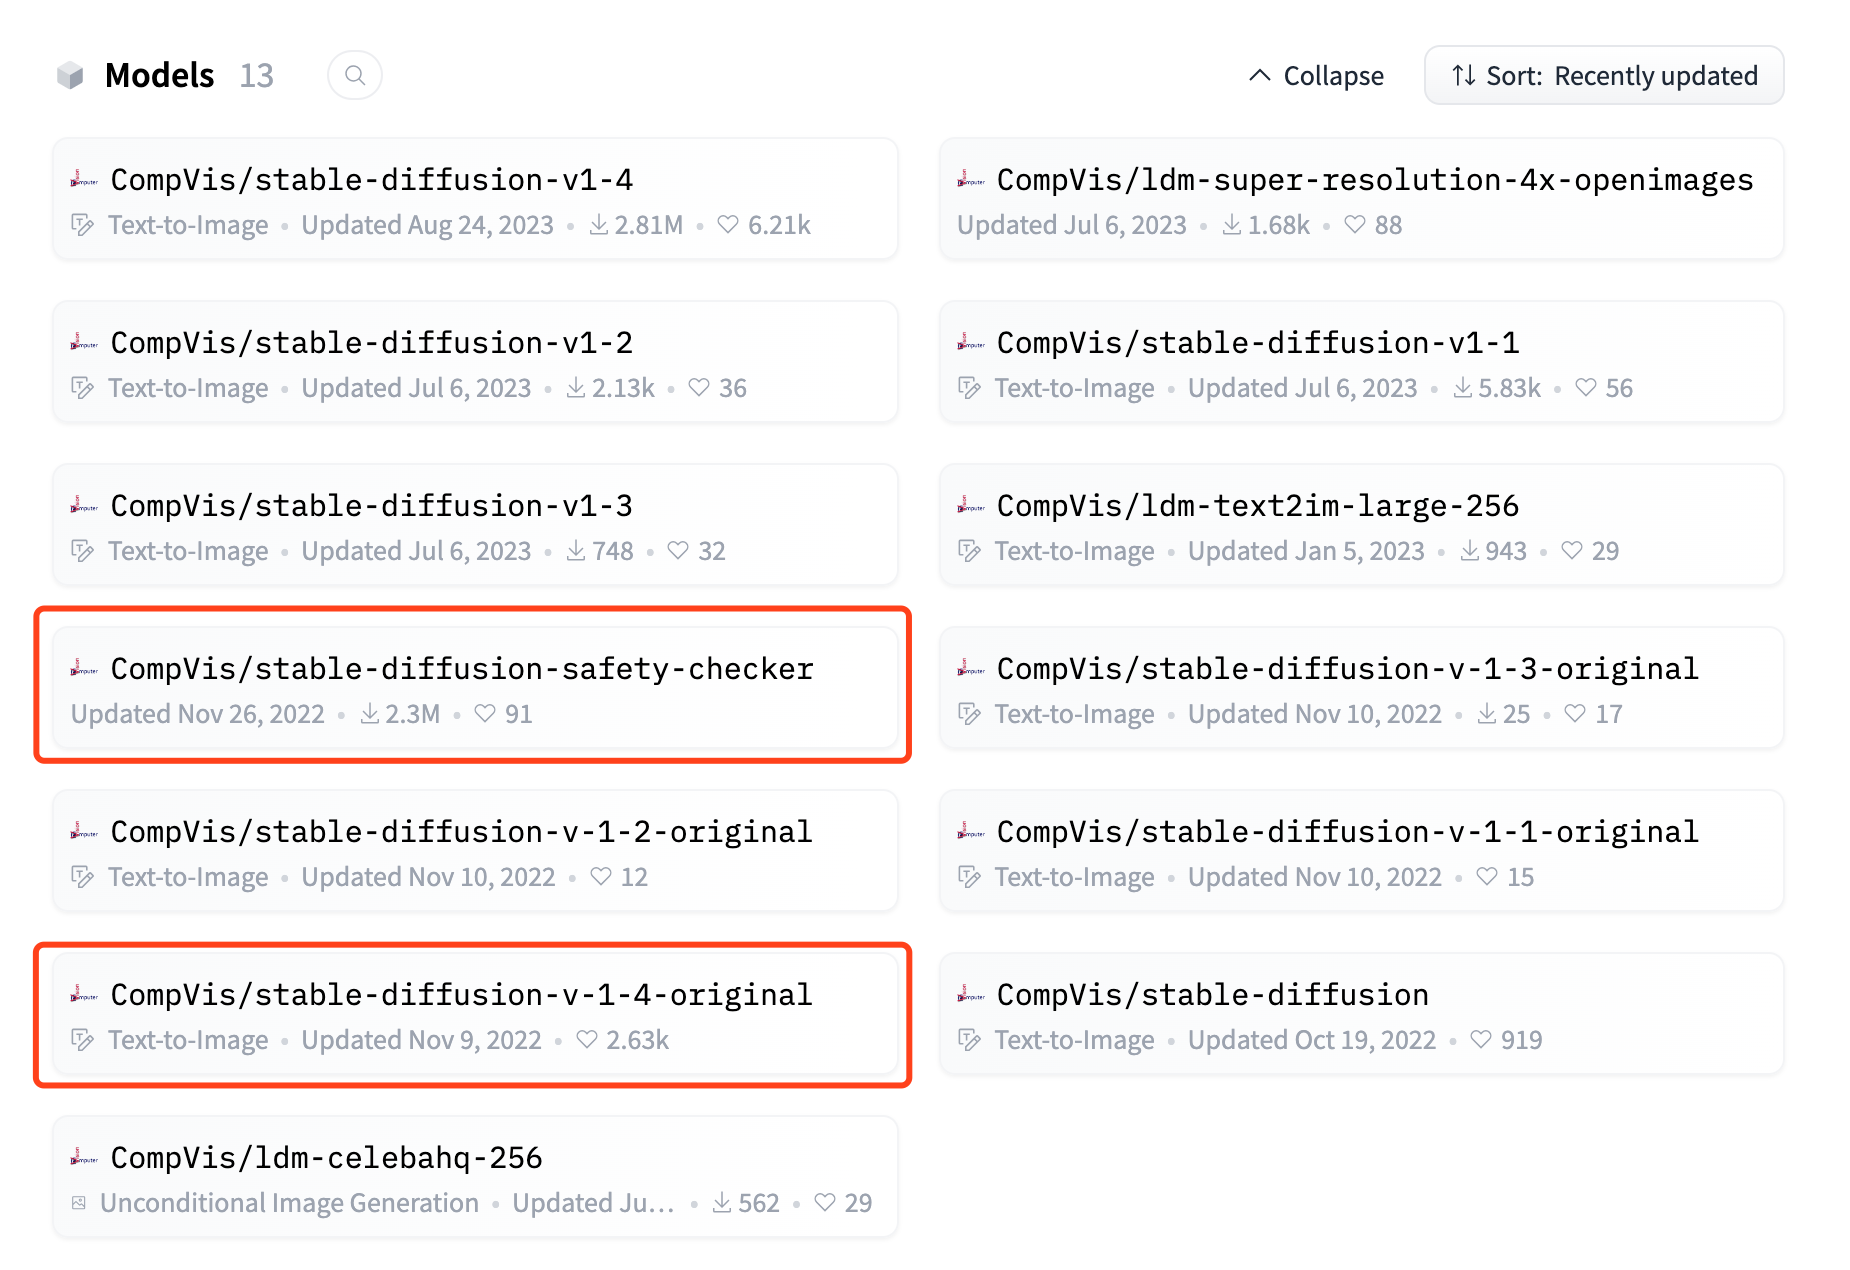
可以看出旗下有较多模型。结合之前工程代码的 README,以及工程代码中的 python 调用脚本,可知主要使用的是 stable-diffusion-safety-checker 和 stable-diffusion-v-1-*-original。
本地或执行平台
本地平台自然还是依靠超算互联网平台,以及需要特殊配置平台版本的 torch 环境。
部署落地
命令行调用
落地思路与之前类似,
- 在平台上,从 github 拉取工程代码。
- 在平台上,从 hugging face 拉取模型文件。
- 代码中的远程模型调用时,调整模型文件地址为本地。
- 在平台上,配置 torch 环境和项目环境,用命令行调用本地的模型,查看结果。
- 出现异常,则根据报错内容,返回步骤 3 和 4 进行修复。
# LLM目录
cd LLM
## 1. 拉取 git 代码
git clone https://github.com/CompVis/stable-diffusion.git
  ...
cd stable-diffusion/

## 2. 拉取 hf 模型文件
cd models/
# stable-diffusion-safety-checker
git clone https://hf-mirror.com/CompVis/stable-diffusion-safety-checker
cd stable-diffusion-safety-checker/
wget -O pytorch_model.bin --no-check-certificate https://hf-mirror.com/CompVis/stable-diffusion-safety-checker/resolve/main/pytorch_model.bin?download=true
cd ..
# stable-diffusion-v-1-4-original
git clone https://hf-mirror.com/CompVis/stable-diffusion-v-1-4-original
cd stable-diffusion-v-1-4-original
wget -O sd-v1-4-full-ema.ckpt --no-check-certificate https://hf-mirror.com/CompVis/stable-diffusion-v-1-4-original/resolve/main/sd-v1-4-full-ema.ckpt?download=true
wget -O sd-v1-4.ckpt --no-check-certificate https://hf-mirror.com/CompVis/stable-diffusion-v-1-4-original/resolve/main/sd-v1-4.ckpt?download=true
cd ..
# fixbug:clip-vit-large-patch14 拉取到本地,并在后续进行本地调用
git clone https://hf-mirror.com/openai/clip-vit-large-patch14
cd clip-vit-large-patch14/
wget -O flax_model.msgpack --no-check-certificate https://hf-mirror.com/openai/clip-vit-large-patch14/resolve/main/flax_model.msgpack?download=true
wget -O model.safetensors --no-check-certificate https://hf-mirror.com/openai/clip-vit-large-patch14/resolve/main/model.safetensors?download=true
wget -O pytorch_model.bin --no-check-certificate https://hf-mirror.com/openai/clip-vit-large-patch14/resolve/main/pytorch_model.bin?download=true
wget -O tf_model.h5 --no-check-certificate https://hf-mirror.com/openai/clip-vit-large-patch14/resolve/main/tf_model.h5?download=true
cd ..
cd ..

## 3. 修改文件引用为本地,以及 fix 各种 bug
# fixbug:按 readme 的软链接不行,需要拷贝模型参数文件到目标目录
mkdir -p models/ldm/stable-diffusion-v1/
cp models/stable-diffusion-v-1-4-original/sd-v1-4.ckpt models/ldm/stable-diffusion-v1/model.ckpt
# fixbug:VectorQuantizer2 的报错
vi ldm/models/autoencoder.py
	…
	from taming.modules.vqvae.quantize import VectorQuantizer as VectorQuantizer
	…
# fixbug:找不到ldm + 修改所有的 CompVis/stable-diffusion-safety-checker 为本地
vi scripts/txt2img.py
	…
	sys.path.append(os.path.join(os.path.dirname(__file__), "..")) # fixbug:找不到ldm
	from ldm.util …
	…
	safety_model_id = "./models/stable-diffusion-safety-checker"
	…
# fixbug:找不到ldm
vi scripts/img2img.py
	…
	sys.path.append(os.path.join(os.path.dirname(__file__), "..")) # fixbug:找不到ldm
	from ldm.util …
	…
# 修改所有的 openai/clip-vit-large-patch14 为本地
vi ldm/modules/encoders/modules.py
	…
	def __init__(self, version="./models/clip-vit-large-patch14", device="cuda", max_length=77)
	…
# fixbug:运行时下载会卡失败,直接 wget 到目标文件夹,或者下载后上传
wget -O /public/home/${user_name}/.cache/torch/hub/checkpoints/checkpoint_liberty_with_aug.pth --no-check-certificate https://github.com/DagnyT/hardnet/raw/master/pretrained/train_liberty_with_aug/checkpoint_liberty_with_aug.pth

## 4. 安装 python 的各种环境
# conda 环境创建
~/miniconda3/bin/conda env create -f environment.yaml
# 创建过程中,若因网络问题,包未完全下载完成导致退出,则用该命令继续更新  ~/miniconda3/bin/conda env update -f environment.yaml
# 激活 ldm 环境
source ~/miniconda3/bin/activate ldm
export LD_LIBRARY_PATH=~/miniconda3/envs/ldm/lib:$LD_LIBRARY_PATH
# fixbug:OSError: libmpi.so.40: cannot open shared object file: No such file or directory
~/miniconda3/bin/conda install -c conda-forge openmpi=4.1.2
# 若conda创建环境无问题,则无需手动安装依赖包 pip3 install transformers==4.19.2 diffusers invisible-watermark omegaconf einops taming-transformers clip kornia==0.6 -i https://pypi.tuna.tsinghua.edu.cn/simple
# 安装平台版本的 torch
pip3 install /public/software/apps/DeepLearning/whl/dtk-22.10/pytorch/torchvision-0.10.0a0+e04d001.dtk2210-cp38-cp38-manylinux2014_x86_64.whl
pip3 install /public/software/apps/DeepLearning/whl/dtk-22.10/pytorch/pytorch_lightning-1.9.0-py3-none-any.whl
pip3 install /public/software/apps/DeepLearning/whl/dtk-22.10/pytorch/torch-1.10.0a0+git2040069.dtk2210-cp38-cp38-manylinux2014_x86_64.whl
环境准备好,接下来就可以申请资源,登录远程节点进行作业。
## 登录远程节点,运行模型
salloc -p kshdtest -N 1 -n 16 --gres=dcu:2
squeue
xxx # 找节点名
ssh xxx # 登录到节点
# 激活 ldm 环境
module load compiler/rocm/dtk-22.10.1
source ~/miniconda3/bin/activate ldm
export LD_LIBRARY_PATH=~/miniconda3/envs/ldm/lib:$LD_LIBRARY_PATH
# 运行模型
cd LLM/stable-diffusion/
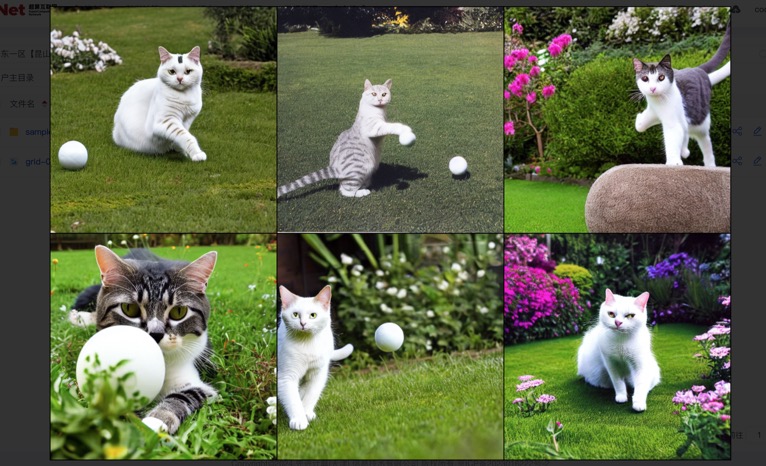
python3 scripts/txt2img.py --prompt "a photograph of a cat playing a white ball in a lovely garden" --plms --outdir=outputs/txt2img-samples
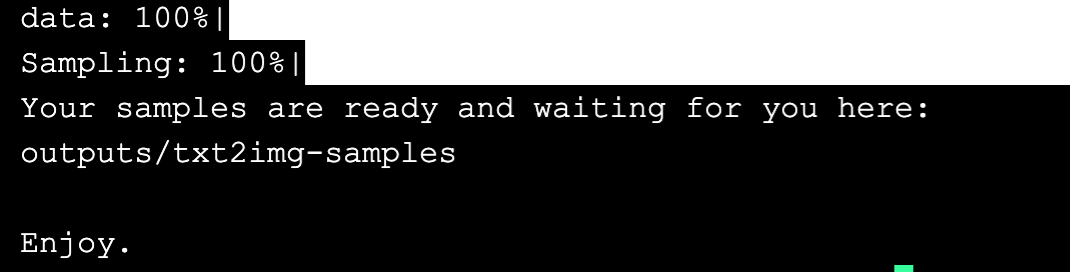
… (大概五分钟)
exit # 登出节点
exit # 退出任务
大概 3-5 分钟便会运行完成,期间控制台上也会进行较多内容输出,最终会提示“Enjoy”说明文生图过程已完成。
去目标目录查看图片,我们的指令是生成“一张猫在花园里玩白色的球”的图片,6 张图片中,有 4 张满足需求。
作业提交方式运行
为后期的训练模型做准备,平台也提供了“作业提交”方式运行任务,而不用人守在控制台前。
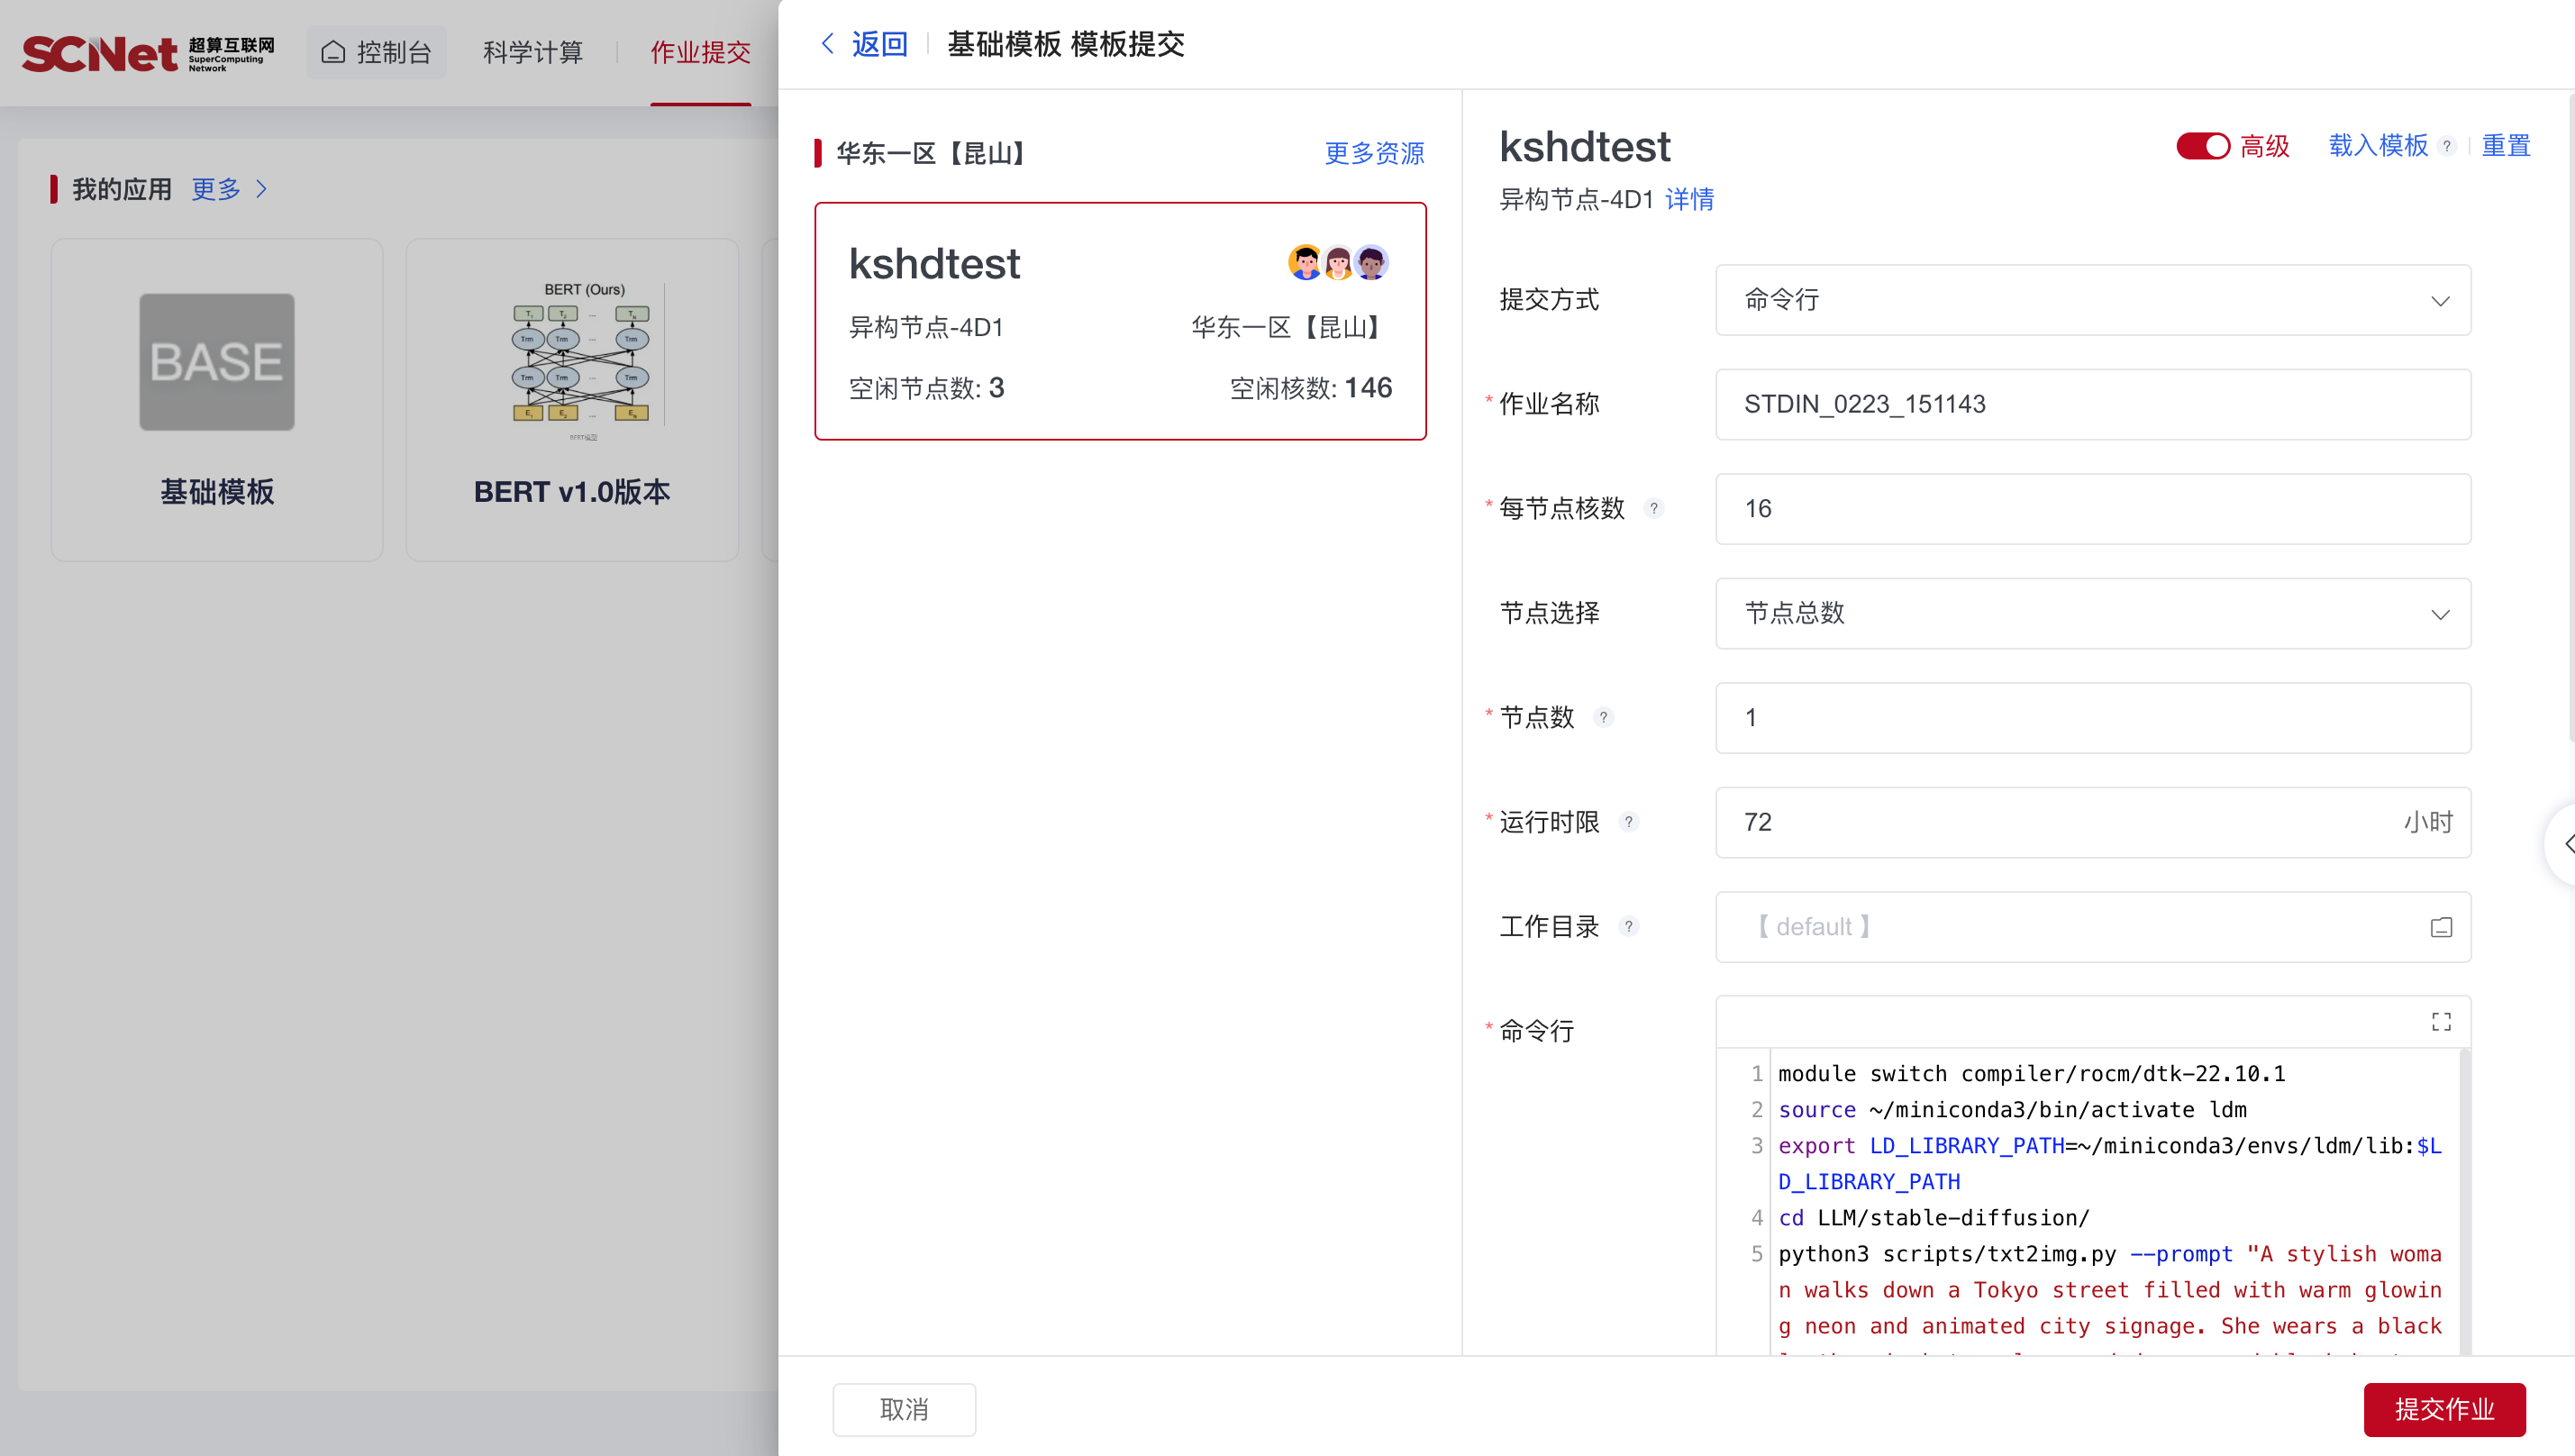
点击基础模板,接着设置核数为 16,DCU 数为 2,工作目录为用户根目录,以及命令行为:
module switch compiler/rocm/dtk-22.10.1
source ~/miniconda3/bin/activate ldm
export LD_LIBRARY_PATH=~/miniconda3/envs/ldm/lib:$LD_LIBRARY_PATH
cd LLM/stable-diffusion/
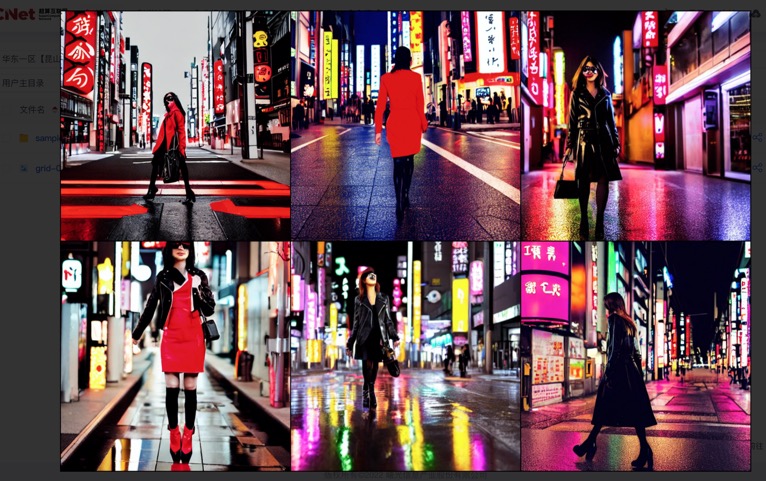
python3 scripts/txt2img.py --prompt "A stylish woman walks down a Tokyo street filled with warm glowing neon and animated city signage. She wears a black leather jacket, a long red dress, and black boots, and carries a black purse. She wears sunglasses and red lipstick. She walks confidently and casually. The street is damp and reflective, creating a mirror effect of the colorful lights. Many pedestrians walk about." --plms --outdir=outputs/txt2img-samples-20240223
点击“提交作业”,便可以托管了。吃个瓜,等个几分钟,待任务变成完成时,就可以去验收结果了。

去目标目录查看图片,本次用的是 Sora 宣传视频的那段指令(时尚女人走在东京的街道上),6 张图片整体内容基本符合,但具体细节能力还有很大差距。
总 结
在有了一次部署经验后,本次仅半天时间就完成了 diffusion 的部署和实验,理论上的不断试错产生的账单大概为 10 元(实际上免费)。
除了已经熟悉的命令行操作,本次也试用了“作业提交”的模式,对 linux 操作的要求进一步降低,也为后期的微调和训练模型做了准备。